how to

How to Plan a Craft Show

Have you ever wondered what happens between, “Hey, let's put together a craft show and call it the Spring Bash!” and “Whew, the Spring Bash is behind us now and I need a nap…”

The Etsy Dallas Bashes are a labor of love for all of us, so we thought it would be interesting to give you a glimpse of what goes into a show like the Spring Bash.

A line of shoppers wraps around Gilley's Dallas before doors open for the 2018 Spring Bash. The first shoppers arrived at 7 a.m. to wait in line for the event that started at 10:30 a.m. on May 5, 2018. Photos courtesy of Mirrorless Mind Studio for E…

A line of shoppers wraps around Gilley's Dallas before doors open for the 2018 Spring Bash. The first shoppers arrived at 7 a.m. to wait in line for the event that started at 10:30 a.m. on May 5, 2018. Photos courtesy of Mirrorless Mind Studio for Etsy Dallas. 

Let’s start by picking a date and a venue.

Venues book up way in advance, so in November as we prep for Jingle Bash, we have already been planning Spring Bash. We usually know where we want to be and when we want to do the show. Oh, but wait, Gilley’s isn’t available both dates we want (we need to book two days so we can set up), and the weekend before/after is Earth Day, Mother’s Day, or the same day as some other show that many of our vendors may want to do. Or, as happened with our 2018 Spring Bash, the NRA Convention came to town and POTUS would be coming in to speak. What would that do to traffic? You can't plan for everything!

After some back-and-forth about the venue and dates, we make a decision and put down our deposit. At this point it's time to start cheering. Yay! We can start telling people to save the date!

Shortly after the holidays, people start asking when the applications are going to come out for Spring Bash. Before we can put out the call for vendors, we need a rough budget. Yeah, Bash prep involves a fair amount of administration, accounting, and budgeting.

The budget looks something like this:

Cost of Bash $$$$$ = Venue $$$$$ + Ads $$$$ + Bash Bags $$$ + T-shirts $$$ + Lighting $$$$ + Printing $$$ + Marketing $$$ + Photographer $$$ + Deco $$$

Next we’ll see if we can get some sponsors lined up to offset some of the costs. Big Etsy sometimes sponsors the Jingle Bash, but we are on our own for Spring Bash. This is the time where we hit up our day jobs, friends, former sponsors, and anyone else who might want to sponsor the Bash.

The next question is, “Will that many vendors fit in our venue?” After some measuring and mock layouts, we're good to go. 

Time to get some vendors.
We update the dates and info on the online application and make them live on the website. Applications come (hopefully) flooding in. Yay! But we can only take about 80 vendors and there are so many good ones to choose from. Boo!

It’s time to jury. Out of ~150 applications, we have to narrow it down to ~80. On top of that, we have to make sure there’s a good mix of product categories. Jewelry and home goods are 40% of the applications, so we have to make sure we have the right number of each category and that the one’s we pick are different enough from each other to make sure there is variety within the category as well. We just can't fit all the good shops in.

After a long day of deliberation, we get the vendors down to ~80 and now we need to see how many 10x10s and 8x6s are on our list. There are always more 10x10s requested than we can fit in our venue. A lot more. So we have to review all the vendors who requested 10x10 booths and narrow that down to the ~30 available 10x10 spots (imagine furniture vs jewelry type discussions). We’ve narrowed it down and have the final vendor list with the appropriate number of 10x10 booths. We celebrate with a glass of wine!

More administrative stuff happens.
During the next month or two we send and receive lots of emails about the Bash. Things like we need your logos, don’t forget to pay your invoice, remember to send your Bash Bag goodies in time, no really, we still need your logo, and so on.

We are also updating the Etsy Dallas website to add vendor and sponsor info and promote the Bash and deciding when Deco Party is and what we are going to make. Did I mention that we all have Etsy shops, children, and/or day jobs too… It’s ok, we can sleep again after the Bash.

Time to get the food trucks lined up. What about coffee… that's right, we can't serve food or drinks inside because it's Gilleys. But we can have donuts, right? Yep! Mmm donuts…

There’s also a lot of marketing collateral and graphics to create now. Every ad website wants a different size graphic. Plus flyers, postcards, Bash Bag art, t-shirt art, Facebook frames, Snapchat filters, sharable images for Instagram, Facebook, Twitter, etc., parking passes, Bash Bucks, banners, maps, and more.

Whew…

Where's my booth?
If you have ever planned a wedding reception where your aunt Jo can't sit next to your Aunt Jane, your friend can't sit next to your other friend because she stole her boyfriend in high school, and this side of the family can't be in the same side of the room at the other side of the family because of that thing Uncle Bob did in '82, then you know what planning the Bash booth layout is like. Except instead of family, it's product categories.

We work hard to keep like products away from each other in the booth layout. This is harder than it sounds because we have to consider the booth sizes and products, then sometimes shops drop out, but the next shop on the waiting list sells the same product category as the booth next to the one that dropped, so now a couple people have to move around to make it work.

The day before. It's almost here!
We made it through all the planning and now we are just 1 day from the Bash. Woohoo? We show up the morning the day before and… umm, was that column there in the floor plans? Wasn't this a door last year? Welcome to the chalk game we call booth marking.

Ok, we got this. Move this booth here and those a few feet to the right, a couple more moves and we're good to go. Booths marked, signage up. We have 12 hours before Bash day load in. We are so ahead of schedule.

We always have our vendors come out for a group photo before the doors open. 

Bash Day! Bash Yay!
Back to the venue bright and early. I know it seems like we are yelling, "Unload on the curb and move your car" a lot, but we have to keep this traffic flow going. We've got to get about 30 shops an hour to load in. About 6 cars line up on the curb at Gilley's, that only gives us about 10 minutes per car.

By this time, the volunteers are running around, people are in line for the Bash Bags, and you can feel the excitement. It's time to have a great show!

Wholesale Tips with Alexis

So, you have been making for awhile, and are ready for the next big leap onto store shelves? Our resident bath bomb guru, Alexis of Whipped Up Wonderful, has joined us today to share some wholesaling how-to's.  Check it out, and don't miss her upcoming class at Dallas Maker's Space, Etsy Dallas Presents: Wholesale for Beginners + Q&A for a more in depth look.  You can sign up for the class HERE, and use "LEARN" upon checkout for a surprise discount! 

Getting your toes wet with wholesale can be as simple as your local coffee shop saying “Hey! I love your stuff. Can I buy 20 pieces?” Or it can catch you by surprise when an out of state shop asks for $1,000 of merchandise as fast as you can send out. I’ve seen both scenarios, and it has taken me about three years to be ready for anything. Now, let’s get you ready.

1. Reevaluate your pricing

Let’s look at your pricing. A quick Google search will get you tons of calculators on the matter. They all boil down to a simple equation.

(Labor + Materials) x 2 = Wholesale Price

Wholesale Price x 2 = Retail Price or MSRP

Break out the calculator, and all the receipts and settle in. Draw up a cost sheet for your product. My cost sheet looks something like this:

Don’t forget to factor in the labels, packaging needed, or anything else that makes it a finished product.

How are these prices looking? If a necklace has a cost of $50, do you think that you could get a wholesale client to pay $100 for it?

This is a great time to assess making sure you are getting everything at the best prices. Are there corners you could cut and at what cost?

Let’s think ahead. You have a wholesale client who wants to buy 50 pieces, is there a price for 50 pieces vs 500? Consider tiered pricing. You may not need it for the first year you offer wholesale, but you will thank yourself later when you are in hot demand and have those prices at the ready!

2. Policies - I developed my policies based roughly on my retail policies, but they have changed slightly. It’s always okay to change up policies, but consistency instills confidence. Here is a list of policies I make sure I cover:

Minimum Order - What is the minimum amount you would offer to a wholesale client? There is no magic number as some stores have no minimums and some stores have thousands. Based on your price points in your store, what would be a nice amount to make a little section of a store looked filled out? I find keeping this out of the astronomical side makes me more friendly to Mom & Pop shops.

Minimum for ReOrders - would this be the same amount, or less? You want your client to keep shopping with you, and top up their displays. This is typically a smaller amount than the initial order minimum.

Exchange/Refunds/Damaged Goods - Unless you sell whatever that metal is that Captain America’s Shield is made out of, I guarantee you you will have some damages. They happen. What steps will you do to fix this?

What about unsold goods? Will you return them?

What will the shipping policies be on those decisions?

Again, there are no correct answers here, but I like to put myself in the shoes of the customer. I want to know that my supplier will have my back. If I’m treated well, I’ll shop there again!

Zip Code Protection - Some stockiest may have a shop in a small town. Will you zip code protect in case the shop 10 minutes away also wants to buy your stuff?

Perhaps only on shops that spend a specific amount per month/year?

Net Payment Options - Net payments is when you collect money when goods are delivered. Current popular options are Net 15, 30, 60 - which means if you ship out your goods, the store has 15, 30, or 60 days to pay. You may only want to offer this to repeat customers. You may not want to offer this at all.

Other Payment Options - Stockists usually aren’t giant corporations but rather Mom & Pop Shops. Will you offer any special options for your return clients? Perhaps deposits on orders then net options after delivery? Payment at time of shipping? There are a ton of options, and you’ll probably get asked for all of them! It’s okay to be flexible, but do what fits your company best!

3. Photographs

Okay! We ironed out all that money stuff. Now for “sellin’ it.”

Because you are an online company, your customers rely on the photos and descriptions you provide. Look over your photos. Are you going to make them Amazon ready and photograph everything on white? This actually is a good default to have for your line sheet later. Which brings us to…

4. Line Sheet & Order Forms

Because everything is online now, I’ve never had to worry about a physical Order Form. However, you may have local clients who expect you to pop by and help them with their stock.

Line Sheets are an easy to read list of the products you offer and their price. Some line sheets even show the prices available in bulk tiers ($/20 $/100 $/100)

On Etsy, it’s easy to fill up a line sheet with your existing inventory. Or you can make one yourself.

5. Making Your Items Shop Friendly

Sometimes we get too involved in our retail customers. How you package your items for them, might not work in a shop setting. Look at your packaging. Go shopping for similar items. Consider the best way your items will be displayed. Where will the price tags go? Will they hang on a rack or will they be displayed in a jar? You are in luck if you have a local shop. Go to the shop, and discuss options with the shop keeper. Different shop keepers have different real estate options.

6. Follow up!

You’ve done all the work, you’ve turned on your ‘Open’ Sign, now what?

FOLLOW UP! Shop keepers are often very busy and are pulled in a lot of different directions. Following up on emails is a good way to keep you in their mind, and keep them coming back.

Send out restock notifications, new product notifications, and stay ahead of the holidays. Your client will appreciate your attention to detail and your enthusiasm for keeping them stocked.

How to Make a Linocut Block by Wandering Paper Co.


Allow me to introduce you to Alex George, new Etsy Dallas member, and creative spark behind the eclectic, multicultural inspired prints and cards at Wandering Paper Co.  

She has thoughtfully prepared a linocut and block printing tutorial, and has given me permission to share.  Enjoy and check out her vibrant shop and blog!

Materials:Speedball Speedy-Carve block, size 4x6"Hard Rubber Brayer Pencil & Paper Adobe Illustrator (optional), Speedball Linoleum Cutter & Assorted Attachments

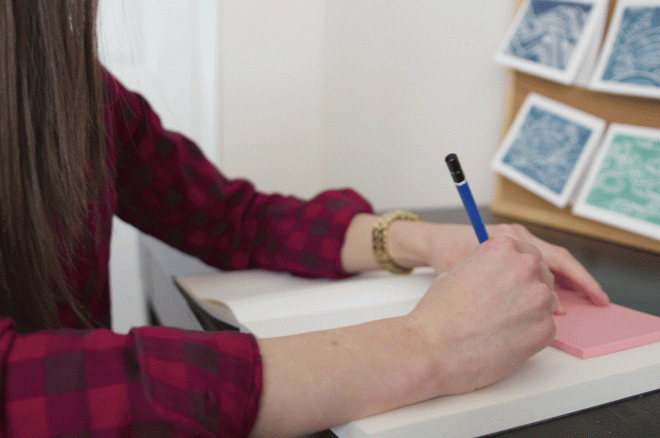
First, measure a 4x6 rectangle on a sheet of paper.  You can do this quickly by tracing your 4x6 block.

trace a 4x6 rectangle

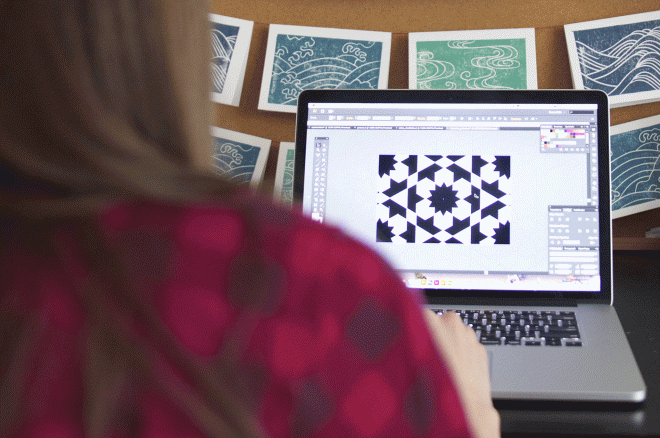
Sketch out your design in pencil first. After I sketch my design out, I usually scan the drawing and fine-tune it in Adobe Illustrator. If you don't have Illustrator, don't worry, this part is optional.

use Adobe Illustrator to fine-tune your sketch

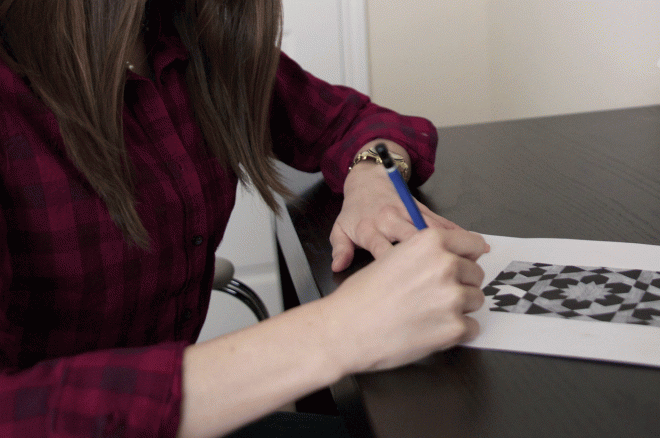
If you do design your print on the computer, print it out and color in the negative space with pencil. If you sketched your print out by hand, you can skip this step.

color the negative space on your design in with pencil

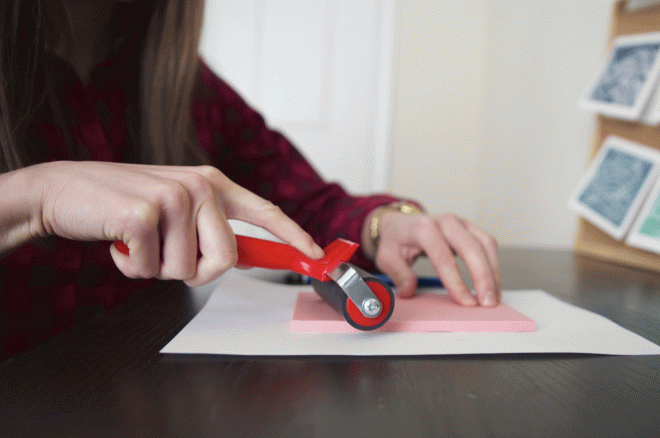
Now you will transfer your pencil sketch to the rubber block. Carefully lay your rubber block over your sketch so the edges align. Use your hard rubber brayer (or your fingers) to press down on the rubber block so the graphite from the pencil transfers from the paper onto the block.

use a brayer to transfer your design

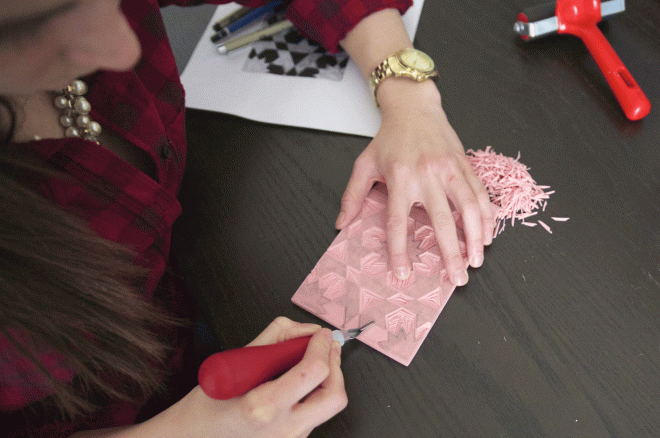
Lift up the block and use your pencil to touch up any areas where the graphite did not transfer.Now use your linoleum cutter to carve your design out of the block. A few tips: Use the tool in a pushing (not pulling motion) for best results. Also, turn the block, not your hand when making a curved line.

carve your block using linoleum cutters

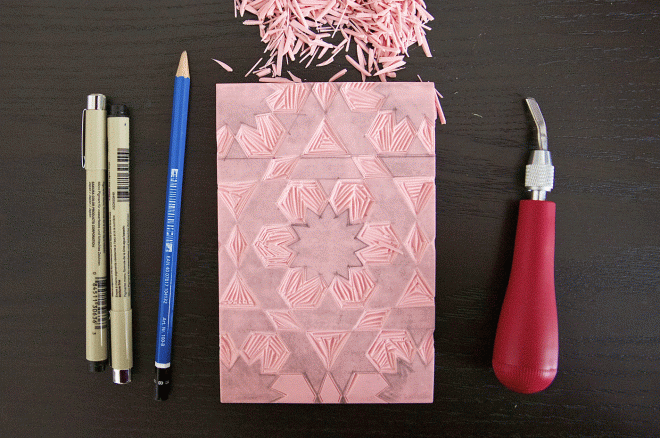
Voila! Your block is carved, and you're ready to print! 


finished linocut block


Thank you so much for sharing your art with us, Alexandra!  Hop on over to her beautiful blog to see how to use your carved linocut block to print in Part 2 of her series!  Happy Saturday, friends and crafters!

How to set up a craft show booth like a pro (part two)

Do you ever wonder what goes into prepping for those craft shows you visit? Have you been thinking about selling your work? We asked Jenny and Sabrina of The Pig and The Peacock for their expert advice on being a vendor. And they delivered! Check out their earlier post if you haven't already …


Prep for Doing Business
One or two weeks before the show, gather everything you need to do business and ring up transactions. Pens, calculators, invoice/receipt books, shopping bags, are must-haves.

Make a bank run to get change – think about your price points and plan your change based on that. If you take credit card payments via Square or any other device or app, make sure they are in working order and that you remember passwords for apps. Another thing we do is create a cheat sheet of all of our items pricing with tax. At the bottom we have every price point from $1-$100 with tax added for quick reference.

Prepare for the Day
Bring bottled water or soda and snacks even if there will be food/drinks on site. You may be too busy to take a break! Be sure to snack when you can so you don't run out of energy toward the end of the day. It's also great if you can recruit friends to help, whether it is to drop off lunch, give you a break or support.

Prepare for the Unexpected
Know that no matter how much planning you do, you can't plan for everything, but you can try your best to be prepared so if the unexpected does happen, you have it covered. We always bring a disaster kit. In this kit, along with our pens and invoice books, we keep the following:
  • Stapler
  • Scotch tape
  • Duct tape 
  • Packing tape (no joke we bring 3 kinds of tape with us and have used them all!)
  • Kleenex and napkins
  • Safety pins
  • Advil (you will be glad you had it)
  • Calculator
  • A multi-use tool
  • Lighter
  • Power strip
  • Extension cords
  • Bungee cords
  • Band-Aids
  • Purell
  • Sharpies
  • Blank index cards (for ad-hoc signage)
  • Business cards
  • Notebook – we like to take notes of things we forgot or wish we had and items customers asked for that we currently don't make
  • We also bring a hand truck and a thick floor mat to stand on

Have Fun Selling
The best part of being at a craft show is being able to talk with your shoppers, and tell them about your process and your passion for your craft. Have fun selling and they will have fun shopping.

If you are on the shy side, think about an opening line to break the ice – perhaps something that makes your items special or what inspired you to make it. Instead of answering questions with a yes or no, take advantage of the opportunity to tell people more about the item too. Even a simple hi and a smile will go a long way to make people feel welcome. We like to chat with people and ask them how they are enjoying the event as a whole, and find out what cool things they have seen at other booths. 

How to set up a craft show booth like a pro (part one)


Do you ever wonder what goes into prepping for those craft shows you visit? Have you been thinking about selling your work? We asked Jenny and Sabrina of The Pig and The Peacock for their expert advice on being a vendor. And they delivered! Check back soon for part two …

https://www.flickr.com/photos/edpresspics/14061342030/

Craft shows are a great opportunity to boost sales and meet your customers face to face so you can show them what you are all about. In order for you and your shoppers to have the best experience possible, you need to plan ahead and prepare.

Make Enough Product
First and foremost you need product – and plenty of it. You should aim to still have a relatively full display toward the end of the show. If your booth looks empty, you might get passed by. Depending on your price points, you should expect to sell 1/4 to 1/3 of the inventory you bring. The best way to be prepared is to make a production schedule and try to stick to it. Then bring everything to the show, even if you aren't sure you will sell it.

Lay Out Your Booth Space and Displays
About three weeks before the show, plan your booth space. Decide what your table layout will be, how your displays will be set up and where chairs and product storage will go but still be easily accessible. Tape off the booth space on the floor or driveway and be sure everything fits. Once you have a "floor plan," decide how your goods will be displayed.

You want to be sure your displays hold enough product, are easily shop-able, and add height and interest to your booth. Anything can be used as a display, from old crates and quirky vintage suitcases to simple metal hanging racks or risers. Bring tablecloths for your tables to create a visually appealing display that allows you to hide stuff under the table. Remember to consider lighting needs. Check out this Flickr Craft Show Group for ideas.

Create Signage
On average, a customer will ask the price of items only twice before they feel uncomfortable asking again. Put them at ease by creating signage or putting price tags on all of your items. Make sure the sign is easy for them to spot and big enough to read from a distance. Also be sure you have business cards handy and in a place that is easy for shoppers to find.