DIY on a Dime

Easter Bunny DIY

Happy Easter! If you're looking for a fun and easy project to do with the kids, then look no further than this paper Easter bunny tutorial. Not only is this craft adorable and festive, but it won’t cost you a fortune in eggs (what’s up with these crazy egg prices anyways?!).

Supplies:

  • 3 Sheets of white paper for the bunny’s body

  • 1 sheet of color paper for the bunny’s ears, nose, and feet

  • Scissors

  • Ruler

  • Pencil or black marker

  • Twine or thread

  • Glue stick


Let’s Get Started!

Step 1: Gather your supplies and take your two sheets of white paper and cut them into 8” squares.

Step 2: Using your ruler fold the both pieces of white paper accordion/fan style in 1/2” sections.

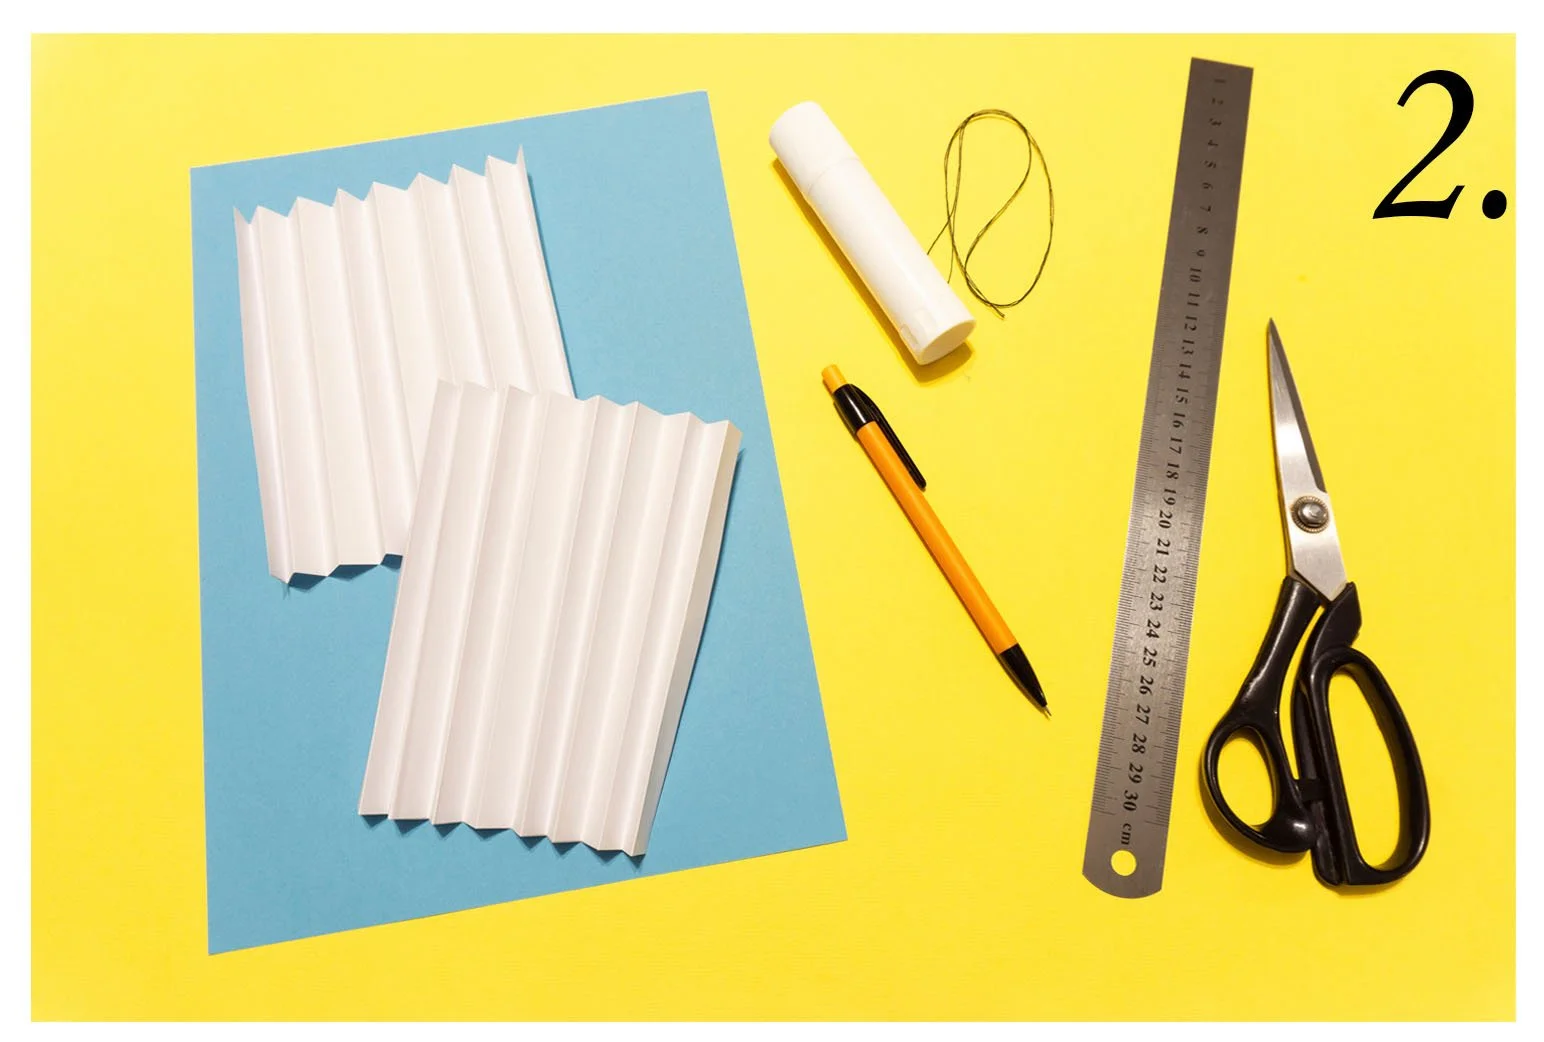
Step 3: Put glue on one end of each piece of accordion paper

Step 4: Attach the two individual pieces of paper together to make one longer accordion style piece of paper.

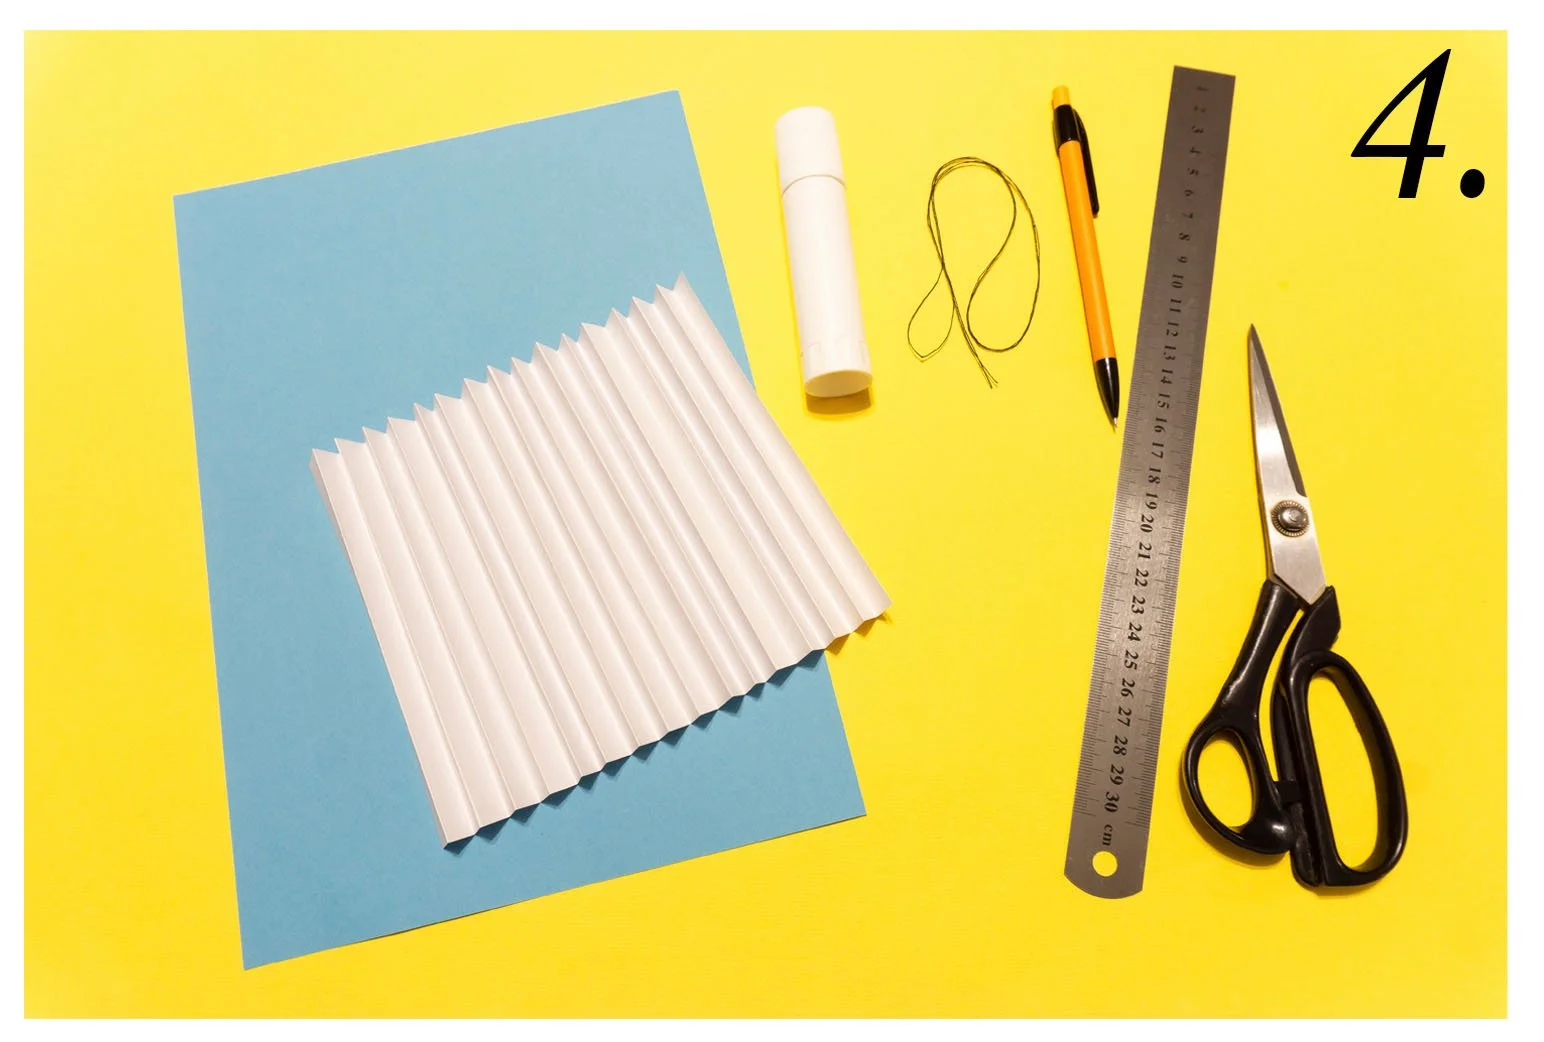
Step 5: Use your ruler to mark the middle (4”) of the paper, and take your twine or string and tie it around the paper to cinch it in the center.

Step 6: Use your glue stick to attach the flat ends of the paper fan to each other, forming a circle. This will be your bunny’s body.

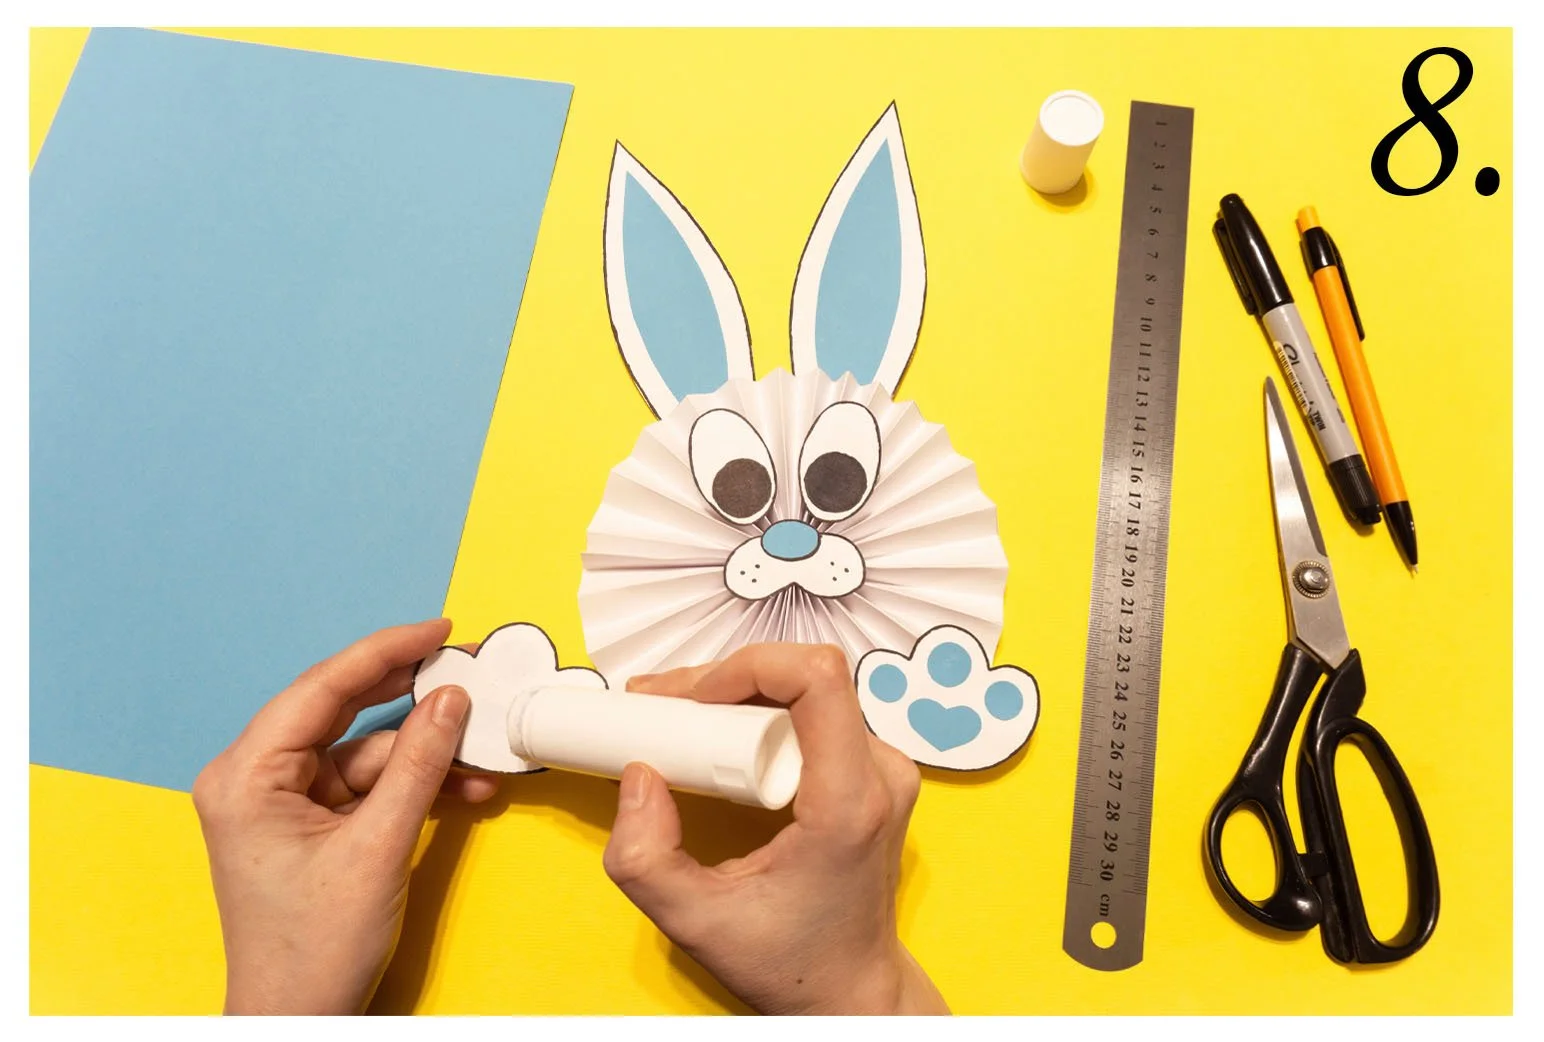
Step 7: On your remaining piece of white paper, draw and cut out the bunny’s ears, eyes, nose, and feet. Then taking your color paper, draw and cut out smaller ears, and circles or hearts for the bunny’s toes and nose.

Step 8: Use your glue stick to attach the color paper bunny parts to the white pieces. Then glue the bunny’s ears, eyes, nose, and feet to the body.

Step 9: Using a marker, color in the bunny’s eyeballs, and some whiskers on it’s nose. For some added fun, you can glue a cotton ball to the back for a tail.

This paper Easter bunny tutorial is a fun and easy craft that's perfect for the whole family. With just a few simple materials, you can create a cute and festive decoration that will brighten up your home this Easter. So, grab your paper, glue, and scissors, and get ready to craft your way to a hoppy Easter!

Heart Origami Tutorial

If you are new to origami this origami heart tutorial is super easy and a fun and comes together quickly. It is great for anyone to try and is also friendly for tiny hands too.

What you’ll need:

  • Square piece of paper - That’s it!

You can use origami paper if you have it on hand, but I have found that wrapping paper works really well and adds fun colors and designs, but even a post-it note will work!


Step 1

With the color/printed side of your paper facing down, rotate your paper so a corner is facing up (like a diamond) and fold your paper corner to corner.

Rotate it 90 degrees and fold corner to corner again.

Oragami heart step 1 fold paper corner to corner

Step 2

Take the top corner and fold the tip down to the center where the two folds meet.

Step 3

Take the bottom corner and fold it about halfway past the center where the two folds meet and the corner overlaps the last fold you made.

Step 4

You should now have a piece of paper that looks a little like a crystal laying on it’s side. From here you are going to take each side and fold your paper so the bottom edge lines up with the center fold.

You should have somthing that resembles a “V” now.

Origami heart 4 fold bottom edge to center fold

Step 5 - 6

Fold back all of the corners at the top of your “V” shaped piece of paper to round them out.

When you flip your paper over it should look like the diagram in step 6.

Step 7

Flip your paper back over and your heart should be complete. You can make more and change up the sizes or paper colors/patterns to get a variety of hearts.

Once you have a couple of hearts you can string them together to make some garland, you can put little notes inside them (think fortune cookie style), put them in your kids lunches, or just use them to decorate a table or wall!

DIY: Valentine's Day Cards

Want to make a thoughtful handmade Valentine's Day card for someone special (or you waited till the last minute and there are zero cards left at the store?) We have a fun and easy tutorial for you today!


Materials needed:
Cardstock - folded in half
Heart cut out of a piece of paper
Embroidery needle
Embroidery floss in your choice of color (or go crazy with several!)

  1. Take your heart cutout and trace it lightly on the front of your card - use a pencil for this part
  2. Using your embroidery needle poke holes around the heart tracing - be sure to space them out. For the heart on the left you will also need to poke a hole in the center of the heart.
  3. Once all the holes have been made, erase the pencil tracing. Select your embroidery floss color.
  4. Starting from the top of the heart start making big stitches from each hole to the center.
  5. Keep working your way around the heart. You can change colors part way through too.
  6. Once complete, tie a knot on the back side of the card to secure the floss and write a message of your choice!
Instead of making stitches through the center you can randomly make stitches all around the hear for a more abstract look, or do lines straight across for a clean look.

Happy Valentine's Day!


Football Crafts on D: The Broadcast

Football season is here! And who doesn't love a tailgate or game-day party? Today on D: The Broadcast, our Etsy Dallas craft segment was all about how to make decorations that scream spirit and will leave you with plenty of money left to spend on the important stuff (like amazing food and drink).

A simple yarn-wrapped wreath in your team colors is a great way to dress up your front door this fall. It can be as simple or as elaborate as you'd like--and the best part is, you can make one yourself in an evening for under ten dollars! All you need is a foam wreath form, a skein of yarn or two in your team's colors, and an evening in front of the TV.

Tie one end of the yarn, securing with a knot and/or a straight pin into the foam, and start wrapping. You'll get into a groove and soon discover whether you like a loose or chunky look.

football craft wreath
a simple wreath with a combo of handmade and store-bought embellishments

football craft
you can add and subtract embellishments easily when you use a styrofoam wreath--just use a straight pin

Felt is a great way to dress up your wreath because it doesn't ravel and is super easy to work with. There's no need to use a pattern; it's so forgiving! Just eyeball some triangles for a pennant, glue or sew onto a strand of leftover yarn, and you've got a cute banner to stretch across your wreath. I even used a felt-tip pen to write "FROGS"--no fancy embroidery necessary.

The pompons are super quick to make and so cute. Just take a strip of felt about 2" in width and fringe it, leaving about 1/4" at one side--don't cut all the way through! Then roll it up, adding a dot of glue as you go or using a needle and thread and stitching it shut. Apply to the wreath using a straight pin so you can move it as you desire.

felt crafts
roll felt fringe from one end to make a festive pom

At the Spring Bash, we used something similar to this ribbon and fabric garland for our photo booth backdrop. I made this one a little shorter using inexpensive cotton fabric (about a quarter yard of each print) and some leftover ribbons and things I had hanging around the craft room. Again, this project was under $10.

DIY fabric ribbon garland
here's Suzie checking it out on air.

dress up your front porch at your next game-day event. 
Don't sew this. Just don't. Trust me. Just snip your (unwashed!) fabric on the selvage edge and rip. Seriously. Just rip. Once you have a whole pile of fabric and ribbons cut to about the same length (again just eyeball this!), start assembling your garland.

Use a foundation piece of ribbon cut to the length of where you'd like to place it (on an actual tailgate, across your buffet table, on your front porch), plus an extra foot or so so you can tie it securely, and start tying your fabric and ribbons onto the foundation piece. Don't fuss over placement. Just grab pieces and tie. You can always go back and add more or less, depending on the look you're going for, and you can trim to a more uniform length up top and below if you're super picky. :)

Round out the party decorations with a quick and easy way to dress up a boring old beverage tub: a pretty hand towel hanging from one end give a quick pop of color and also gives your guests a way to dry off their drinks. (Nobody likes a bottle or can that drips all over the place.)

there are so many cute ribbons in your team's colors!

a simple straight-stitch appliqué and you're set

Since I went to school up north, I never have a chance to throw a tailgate, so I was delighted to borrow my friends' local team for this segment. They will have the cutest tailgate on Frog Alley.

We'd love to see what you make! Snap a photo and tag us on Instagram or Twitter @etsydallas!

Jenni


DIY on a Dime: BUTTER Gets Re-purposed

Laura Davis of BUTTER is not just my fellow Etsy Dallas member, she's a friend and neighbor.

I love stopping by her house because I'm always sure to see something new she's made with the materials she finds around her. "I try to do everything I can with repurposed materials," says the furniture designer by day, home accessories designer by night (and SCAD alumna, to boot).


"I'm an absolute junkie for thrift stores and estate sales, and I often use my lunch breaks to pop in the thrift stores around my work. My favorite finds = old furniture on the side of the road! You can make some pretty sweet stuff for free." Some of the things Laura makes:
  • clocks from old saw blades
  • lights from old baskets
  • tote bags from fabric samples
  • furniture re-upholstery with vintage/found fabrics
  • napkins from upcycled linens
  • decorative trays from old cafeteria trays


This creative lady is serious about repurposing old materials. She tells me, "I'm trying to be very thoughtful about what I toss out, as well... my fabric scraps either go to teamies [like me!] who could use them, or if small enough (like serger scraps) go to stuffing for plush toys for my nieces." Laura confesses she "almost borderline hoarder" which I can totally relate to.


When she isn't scavenging furniture parts or piling up 6 feet of fabric samples in her office, Laura like to read about repurposing in the crafting age. Some of her recommended reading includes Tossed and Found and Remake It Home.


Visit Laura's online shop to see more of her great repurposed designs: www.BUTTERdesignlab.etsy.com. And if you see her at the thrift store, be sure to say Hi!


posted by Stephanie/tefi